Thursday, April 11, 2013

Freeze Eggs? Yes, You Can!


We have a small farmette and keep chickens for eggs. Right now they are laying very well.  So well, in fact, that we often have more eggs than we can scramble, boil, bake or consume at the moment.  What to do?

FREEZE them!

Yes, you can safely freeze eggs. :)

According to the Georgia Egg Commission, here's how to freeze eggs:

"WHOLE EGGS ~ Beat just until blended, pour into freezer containers. seal tightly, label with the number of eggs and the date, and freeze."

"WHITES ~ Break and separate the eggs, one at a time, making sure that no yolk gets in the whites. Pour them into freezer containers, seal tightly, label with the number of egg whites and the date, and freeze. For faster thawing and easier measuring, first freeze each white in an ice cube tray and then transfer to a freezer container."

"YOLKS ~ Egg yolks require special treatment. The gelation property of yolk causes it to thicken or gel when frozen. If frozen as is, egg yolk will eventually become so gelatinous it will be almost impossible to use in a recipe. To help retard this gelation, beat in either 1/8 teaspoon salt or 1 1/2 teaspoons sugar or corn syrup per 1/4 cup egg yolks (4 yolks). Label the container with the number of yolks, the date, and whether you've added salt (for main dishes) or sweetener (for baking or desserts)."


Use fresh eggs and try to not get a lot of excess air in the eggs when you mix them.

How to use the eggs once they are frozen is explained by the  Georgia Egg Commission:

"To use frozen eggs... Thaw frozen eggs overnight in the refrigerator or under running cold water. Use yolks or whole eggs as soon as they're thawed. Once thawed, whites will beat to better volume if allowed to sit at room temperature for about 30 minutes.
Substitute 2 tablespoons thawed egg white for 1 Large fresh white.
Substitute 1 tablespoon thawed egg yolk for 1 Large fresh yolk.
Substitute 3 tablespoons thawed whole egg for 1 Large fresh egg.
Use thawed frozen eggs only in dishes that are thoroughly cooked.

We have used our frozen eggs and they are just great! We scrambled them for breakfast and you couldn't tell the difference from fresh eggs. 

I wouldn't recommend using store bought eggs. Fresh eggs from your chickens (or from your friend's chickens) are a better option. 

I freeze my eggs in Ziploc bags but you can use any container that is safe for the freezer. I freeze them in portions that I might readily use but the above chart will help you figure out what you need. 

Give it a try! 


You will find us linked up at some of these fine sites.
Linking up on these fine sites.

Tuesday, April 9, 2013

"Good Morning!" Granola


Julia here! Good morning! ;) We all know that a healthy breakfast is the best way to start your day! It revs up your metabolism and gives you the fuel you need to kick off your morning. This granola recipe is a wholesome and delicious option that's easy to make ahead of time so you can grab 'n go!

My favorite way to eat this granola is layered in a parfait with yogurt and fresh fruit, but it's a great snack all by itself, packed with flavor and fiber.

And guess what? Making it is EASY! Intrigued? Read on...

Ingredients:

  • 1 stick of butter (1/2 cup)
  • 1/2 cup of honey
  • 4 cups oatmeal
  • 1 tsp. vanilla
  • Nuts~ I use 1/2 to 1 cup of chopped pecans, and 1/2 to 1 cup of sliced almonds
  • 1 Tbsp. cinnamon
  • 1/2 to 1 cup raisins
  • 1/2 cup craisins (sweetened dried cranberries)
Other options you could toss in: coconut flakes, other nuts, other dried fruits, or chocolate chips. If you want to go decadent, add some white chocolate chips or peanut-butter-chips! Note: you'll want to add the chocolate chips after baking. :)
You know, I've always wanted to try this with dried mango and pineapple. Let me know how that works if you end up trying that out! :D

Directions:

  1. Preheat oven to 400 degrees (F)
  2. Mix dry ingredients, oatmeal, nuts, dried fruit, and cinnamon in a large mixing bowl.
  3. Melt butter in small saucepan. Add the honey and mix well. Bring the honey/butter mixure to a boil and boil for one minute. Add the vanilla. 
  4. Pour honey/butter over dry ingredients and mix until thoroughly coated. Spread onto a jelly roll pan or cookie sheet and bake for 8-10 at 400 degrees (F). Stir/scoop around/flip the granola and bake for an additional 5-6 minutes until golden brown. 
  5. Store in a closed container.

Want to know where Gloria got the sweet spoon? Check this shop out to find the cutest stamped flatware EVER! Stop by Aly's blog to let her know if you like it. 
Have a wonderful day!


You will find us linked to some of these fine sites.

Sunday, April 7, 2013

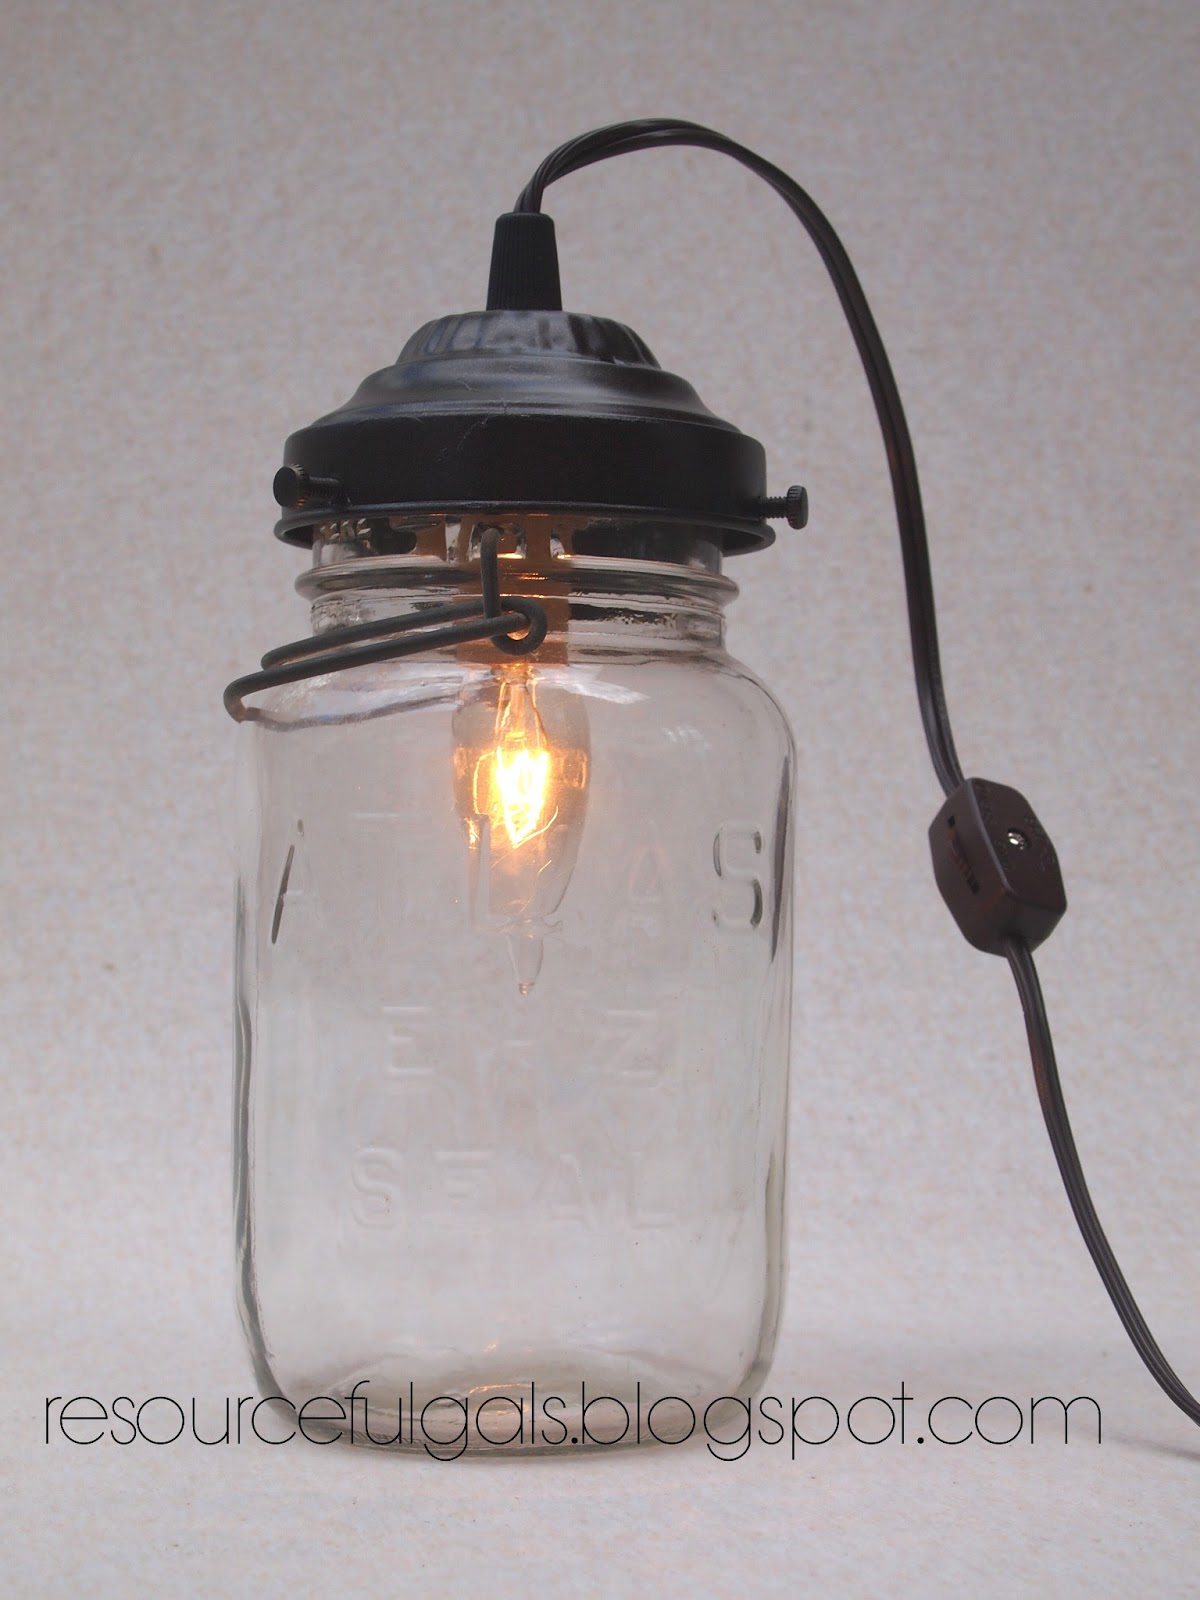
Mason Jar Lamp Tutorial


Mason jars are all the rage right now! Get ready to learn how to MAKE your own LAMP using one! This is an easy, simple, step-by-step tutorial, designed for even non-electricians. :D We even tell you where to get all the parts!

Use one of these beauties in your own home decor and add some down-home charm!

Now available in our Etsy Shop, Cabin Shabby Chic!! 


Tools and Materials Needed:


  • Phillips screwdriver
  • Mason jar with wire bail
  • Shade holder 3 1/4 inch.  {Got it here for $1.50} {This is also an option, save shipping by buying from one place} 
  • Spray paint (optional)
  • Bushing  {Got it here for 85 cents}
  • Candelabra socket   {Got it here for 65 cents}
  • Cord with plug and clicker switch  {Got it here for $2.50}
  • Candelabra light bulb

Directions:

Find a wire bail Mason jar, if you don't already have one. You can find them at antique shops, thrift stores, yard sales and eBay. Make sure you have the kind of jar that has a wire bail and a rim at the top. Most "Ball" jars have the rim, but some "Atlas" jars don't. I bought a couple "Atlas" jars and didn't realize they wouldn't work for lamps. So a word to the wise! 


The lamp parts are easy to order and inexpensive! I got my supplies online from Grand Brass and TX Lamp Parts.  (I buy most of my parts from Grand Brass.)


  • 1. You may want to spray paint the shade holder. We painted ours a nice oil-rubbed bronze. 
  • 2. Thread the top part of the bushing onto the wire as shown. 
  • 3. Thread the wire through the large center hole of the shade holder. 
  • 4. Now put the bottom of the bushing onto the wire as shown. 

  • 5. Carefully slide the cardboard cylinder off from the candelabra socket: you will need it again so don't ruin it. 
  • 6.The silver metal circle on the end of the socket is called the hickey. Thread the wire through the circle of the hickey. 
  • 7. Loosen the screws on the socket slightly, enough to get the wire behind the top of the screw. Bend the wire end into a "C" and wrap around the base of the screw. One on each side. 
  • 8.Tighten the screw so the wire is snug. Screw the hickey onto the bottom piece of the bushing as shown.

  • 9. Slide the bottom bushing piece up through the center hole of the shade holder.  
  • 10. Screw the bushing pieces together with the shade holder in between them. The bushing is a strain relief so the wire doesn't have to take the weight of the jar. 
  • 11.Carefully slide the cardboard piece back onto the base of the socket, covering the wires. This insulates the socket.  
  • 12. Put in the candelabra bulb. 
TA-DAAAAA!!
Place the shade holder on top of the Mason jar so the screws on the side of the shade holder go over the rim at the top of the jar.  Carefully tighten the screws on the side of the shade holder and test to make sure it is securely holding the jar.

Plug in, switch it on and admire the glow that it adds to your special space!


Adventurous Mason Jar Lamp~Screw top Mason Jar


If you have the regular screw-top Mason jar, you can still make a lamp. It will just take one extra step. 

Basically, the lid can be the antique zinc lid or a regular one piece lid. You can spray paint the regular lid if you like.


The extra step.... you must drill a center hole in the lid. Using a power drill, make a hole in the center 7/16 inch in diameter.  Note: My husband did the drilling for me and he said that he started with a smaller hole and worked his way up.  The hole needs to be big enough to fit the bushing into it. 

Also... you need 4 air holes around the center hole. These should be smaller, about 1/4 inch in diameter. 

Don't worry if the zinc lid has a piece of white porcelain in it. (Some do and some don't.)  That needs to go so you can make the lamp. My husband drilled a small hole in the center and then took a sharp nail and hammered it so the porcelain would break. Then he threw the porcelain away. 

That's it! :) Continue with the above instructions for your Mason jar lamp.

Let us know how your lamp turned out. We would love to see pictures!

Now available in our Etsy Shop, Cabin Shabby Chic!! 


Happy decorating,


You will find us linked up at some of these fine sites.

Simple Sunday Thoughts #1


Worries melt away... sadness and sorrow flee... I worship my Lord and King, and I know that he treasures me. ;) I forget to be stressed when I think of His righteousness.

Spending a little time with God today...

Friday, April 5, 2013

Basic Whole Wheat Bread Recipe

Gloria here. :) So many of our recipes are based in the Basic Whole Wheat Bread Recipe, I thought I'd post it here so it is easier to find. 

Ingredients:
1 1/2 cup warm water
1/3 cup oil ( I use extra virgin olive oil)
1/4 cup honey
1 beaten egg
2 tsp. salt
1 Tbsp. gluten
5+ cups of fresh milled whole wheat flour (store bought is fine, too)
1 Tbsp. yeast

Directions:
Add the ingredients in the order given to your bread machine. Set the bread machine on the dough cycle and let 'er go!

When the dough cycle is complete, spray 2 bread loaf pans with Pam or grease them with butter. Cut the dough in half and flop into the pans. Yep, I said flop! They will come out fine! 

Cover the pans and let rise until double, about an hour. 

Bake at 350 degrees (F) for about 29-30 minutes until golden brown. (Ovens vary.)

Remove immediately from pans and cool on a cooling rack. Bag when completely cooled. 

This recipe is adapted from the Sue Beckers recipe for Whole Wheat Bread, find her here.

Enjoy!!


You will find us linked to these fine sites.

Thursday, April 4, 2013

Brunettes Bars


Julia here! Today we're sharing one of our very favorite healthy desserts, which we've fondly nicknamed "Brunettes". It's actually a blondie, (instead of a brownie) but since we make them with sucanat, a healthy sweetener, they come out a delightful light brown color, lighter than brownies and darker than blondies. Thus, I christened them "Brunettes". ;)

These look and taste SO GOOD, you won't believe how healthy they are. :D

Ingredients:

{Makes a 9x13 pan of Brunettes}
  • 3/4 cup of butter
  • 2 and 1/4 cup sucanat
  • 3 eggs
  • 3/4 tsp. salt
  • 2 and 1/4 cups freshly ground, whole-wheat flour
  • 3 tsp. baking powder
  • 1 and 1/2 tsp. vanilla
  • A sprinkle of toppings of your choice (we used chopped pecans).

Directions:

  1. Preheat oven to 350 degrees.
  2. Lightly butter or grease your 9x13 baking pan. 
  3. Melt the 3/4 cup butter and whisk the eggs into it. Combine dry ingredients and mix the dry ingredients together. Add the egg mixture to the dry mixture and stir (I use a fork) until it's all moistened. 
  4. Pour/scoop the batter into the pan and spread evenly. Sprinkle with toppings. Bake for about 25 minutes or until slightly golden brown. Let the bars cool for a few minutes before devouring. ;) 
Easy-peasy! These are SO good, they have a sweet and wholesome flavor and they're practically guilt-free. :D Just don't eat the whole pan in one sitting. ;) 

Enjoy!


You can find us linked up to some of these fine sites.

Wednesday, April 3, 2013

Bloglovin'


Follow my blog with Bloglovin

Simple Sprouting


We love sprouts! They are so good for you and tasty, too!

When I started sprouting again last year, ( had done it years ago), I tried making my own sprouter. What can I say, I am a DIYer at heart!

Well, it was a dismal failure. The sprouts got moldy and didn't grow well. Then I found the Easy Sprout  Sprouter! I love it!

The Easy Sprout Sprouter makes sprouting a joy. I got mine on Amazon here but you can find them elsewhere.

I bought my seeds from Sprout People. The seeds are wonderful and I especially love their mixes. The shipping was high for me as we don't live near them but it was worth the price. I bought several pounds of seeds so it was still a good deal. You can also buy the Easy Sprout Sprouter from them.

The Sprout People website has extensive information about sprouts, how to grow them and rinse them.

Basically, you give the sprouts an initial soak and then rinse morning and night until they have grown enough to eat them. It only takes a few days. Check out Sprout People for detailed instructions and videos.

Some nutritional info on sprouts from Sprout People:

"Research shows that sprouts are a veritable fountain of youth. Sprouts abound with antioxidants, they are full of protein, chlorophyll, vitamins, minerals and amino acids. Broccoli sprouts have been found to contain 50 times as much of the antioxidant sulfurophane as mature broccoli. Wheat Grass juice is the closest substance to hemoglobin, and is therefore a phenomenal blood purifier and liver de-toxifier. Sprouts contain enzymes, giving your body a much needed rest as they digest themselves - invigorating you while requiring no help from your body to process them. New research indicates that peanut sprouts reduce harmful cholesterol and that sunflower,buckwheat and grain sprouts dramatically improve the quality of life for diabetics. The list goes on and on."

And this will knock your socks off! " Broccoli sprouts can contain something like 50 times the sulfurophane found in mature broccoli, by weight, so you get as much antioxidant in 1 ounce of Broccoli Sprouts as you would if you ate 3 pounds of fully grown Broccoli."
  
So what are you waiting for? Give sprouts a try! You'll be glad you did!! :)


You will find us linked up to some of these fine sites.

Photo credit of Easy Sprout Sprouter goes to  Sprout People.

Tuesday, April 2, 2013

The BEST Homemade Pizza EVER.

Julia here! How are all of you awesome blog-cruisin' people today?
Um yes. We did say "EVER". No joke! I love pizza as much as the next girl (probably more) and this is the best pizza I've eaten anywhere. Nothing compares. If you are a true pizza-lover you must try this recipe. You will thank me. :D

For Best-Ever Pizza Dough:

(Makes plenty of dough for one pizza with some left over for breadsticks or another small pizza!) 

You will need a bread machine. Skip down to "adequate dough" if you do not.

Add these ingredients to your machine in the order given...

1 ½ cups hot water
1/3 cup oil
¼ cup honey
1 egg, well-whisked
2 tsp. salt
1 Tbsp gluten (optional)
5 cups whole wheat flour (I've found this works best if you add just a little extra flour.)
1 Tbsp active dry yeast


Run your machine on a "dough" cycle. (*happy sigh* I love our bread machine...) Scroll down to 'For Both Doughs' to read the rest.

For Adequate Pizza Dough

(Makes just enough for one pizza)

If you don't have a bread machine (and if you don't, you need one!) here is another version for the crust.

1 Tbsp yeast (or 1 package of rapid-rise yeast)
1 tsp. salt
1 Tbsp. sugar
1 cup hot water

Add these together and let sit for 10 min. so the yeast will activate (and do its wondrous yeasty thing).

Add:

1 Tbsp oil (we use olive oil)
2 cups flour (it can be a mixture of white and whole wheat).

Mix well. Let rise for 45 minutes to an hour.

For Both Doughs:

Roll out on baking stone, pan, or cookie sheet (but the stone will give you the best results!)

Spread dough with sauce of your choice, (Prego is our favorite) freshly-grated mozzarella cheese, (sprinkles of Parmesan cheese and garlic powder will make it 100X yummier) and toppings of your choice. (My favorites are pepperoni, meatball slices, black olives, and... dill pickles. Hey! Don't judge it until you've tasted it, it's delish!) ;)

*TIP* add a little oregano, basil, and thyme scattered across your mozzarella for authentic Italian flavor! :)

Bake at 400º for 23-25 minutes. 


Man, oh man, is it ever good.


The great thing about making your own pizza is that it is inexpensive, WAY healthier than ordering out, and you can customize the toppings to your own family's tastes. It's also a really fun family activity - even younger kids can help put the toppings on their pizza.

Looks like you just found a new idea for Family Fun Night! :D

Leave us a comment if you think you might try this recipe! We love feedback. :)

Enjoy!


We are linking up with some of these fine sites.

Monday, April 1, 2013

Time-Saving Tennis Ball Tips!

It is so amazing that something as simple as tennis balls can be a time-saver!

Three ways to use tennis balls:


1. Button-down shirts.

I throw a few tennis balls in the dryer when I dry blouses and shirts. It fluffs out the wrinkles and saves time because they come out so nice you don't have to iron them! I don't know about you, but ironing doesn't rank high on my "fun things to do in my free time" list! ;) Just be sure to grab them out of the dryer soon after it is done.

No worries! If you didn't use tennis balls and the shirts are wrinkled, put the shirts back in the dryer with only the tennis balls and a wet washcloth or small, wet towel. Dry on medium for about 10 min. and all the wrinkles should be gone! Yay!

2. Down jackets/vests.

Warmer weather is coming and it will be time to pack up the winter coats and jackets. Wash them up before you put them away and you will appreciate it next time cold weather comes.

Check the labels to see if you can wash them. Usually the nylon jackets and vests with down filling can be washed. Wash on cold, gentle cycle. Dry them on medium with several tennis balls. It will fluff the down and keep it fresh. The down must be fluffed or it will mat together and not dry properly.

3. Down blankets.

We use down blankets on all our beds so we can keep the temperature down at night (to save money!). ;)

Just like the jackets, wash on cold, gentle cycle. Dry them on medium with several tennis balls. If the blanket is large, you may have to reposition it, putting the damp side out and dry again. I wash our king size down blanket and have to reposition it a couple of times. Works great!

I never dry clean my down things. I just wash them up, good as new.

Give it a try, you might surprise yourself and have tennis balls in your dryer on a regular basis, too!

We would love to hear how you use the tennis balls. Leave us a comment. We love learning new things!

Blessings,


You will find us linked up at some of these fine sites.