

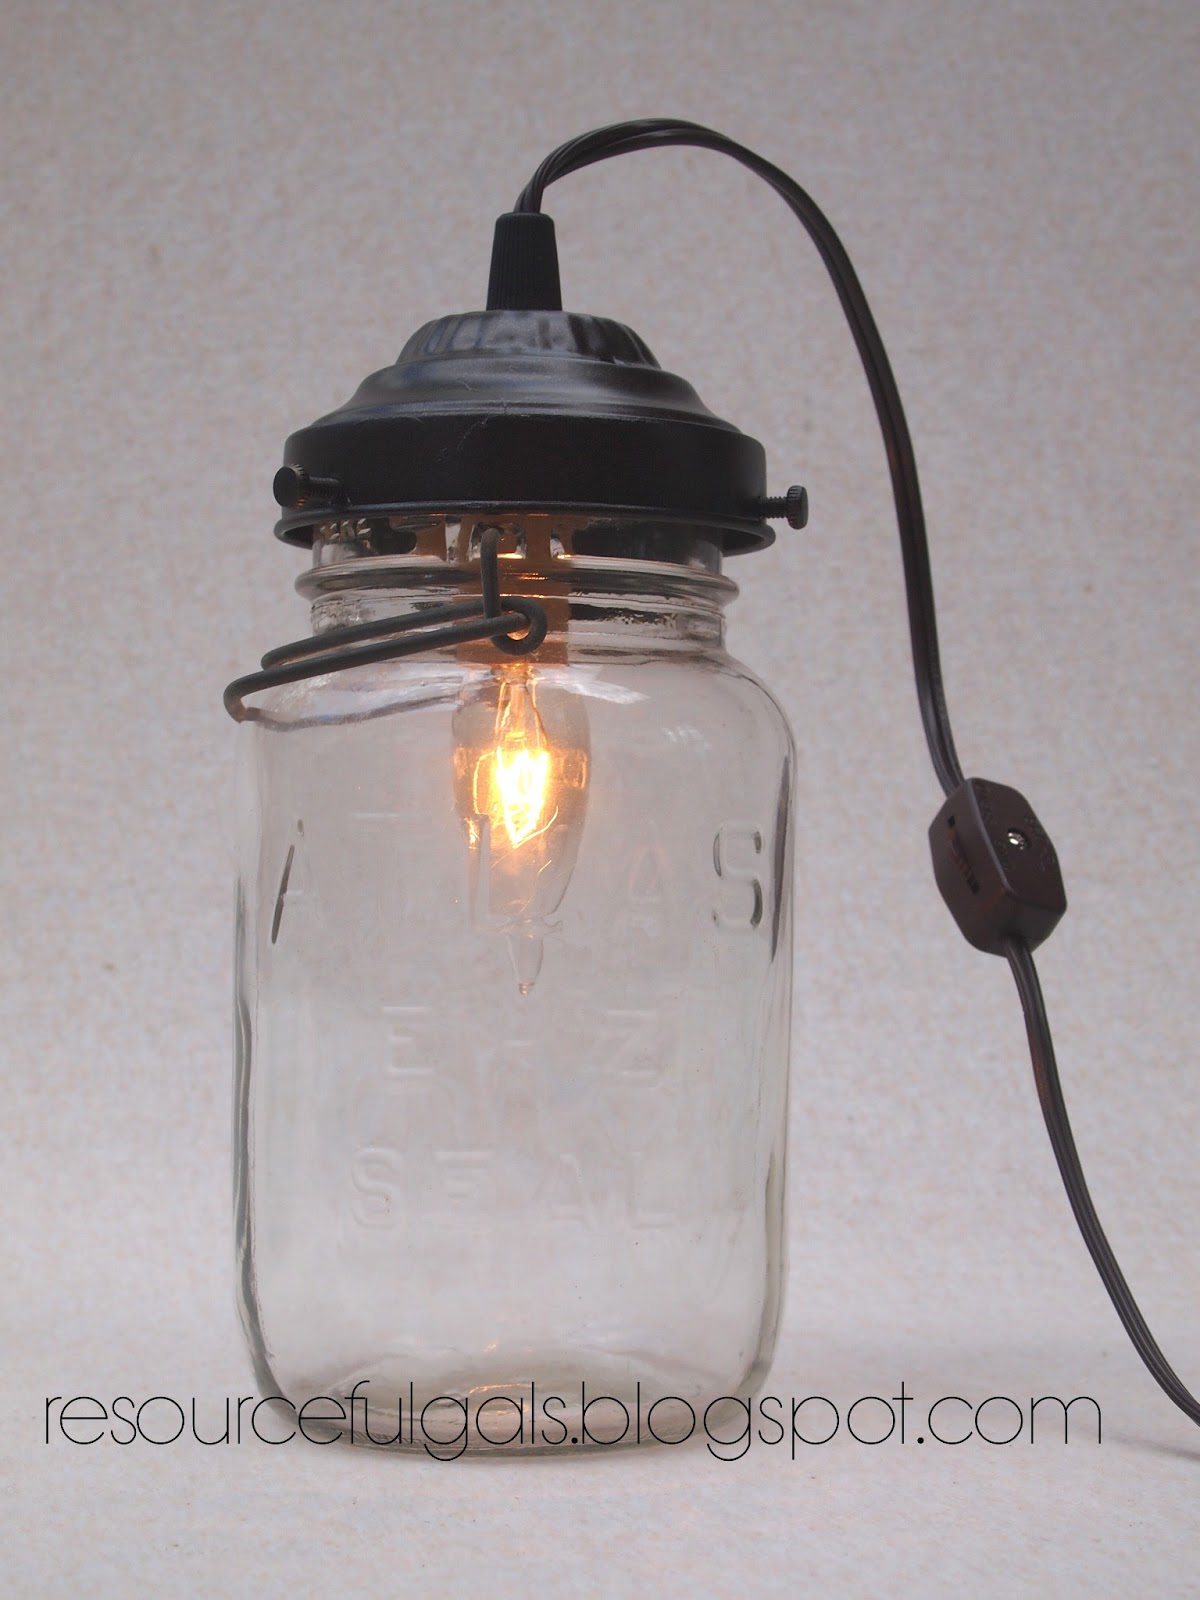
Mason jars are all the rage right now! Get ready to learn how to MAKE your own LAMP using one! This is an easy, simple, step-by-step tutorial, designed for even non-electricians. :D We even tell you where to get all the parts!
Use one of these beauties in your own home decor and add some down-home charm!
Now available in our Etsy Shop, Cabin Shabby Chic!!
Tools and Materials Needed:
- Phillips screwdriver
- Mason jar with wire bail
- Shade holder 3 1/4 inch. {Got it here for $1.50} {This is also an option, save shipping by buying from one place}
- Spray paint (optional)
- Bushing {Got it here for 85 cents}
- Candelabra socket {Got it here for 65 cents}
- Cord with plug and clicker switch {Got it here for $2.50}
- Candelabra light bulb

Directions:
Find a wire bail Mason jar, if you don't already have one. You can find them at antique shops, thrift stores, yard sales and eBay. Make sure you have the kind of jar that has a wire bail and a rim at the top. Most "Ball" jars have the rim, but some "Atlas" jars don't. I bought a couple "Atlas" jars and didn't realize they wouldn't work for lamps. So a word to the wise!

The lamp parts are easy to order and inexpensive! I got my supplies online from Grand Brass and TX Lamp Parts. (I buy most of my parts from Grand Brass.)

- 1. You may want to spray paint the shade holder. We painted ours a nice oil-rubbed bronze.
- 2. Thread the top part of the bushing onto the wire as shown.
- 3. Thread the wire through the large center hole of the shade holder.
- 4. Now put the bottom of the bushing onto the wire as shown.

- 5. Carefully slide the cardboard cylinder off from the candelabra socket: you will need it again so don't ruin it.
- 6.The silver metal circle on the end of the socket is called the hickey. Thread the wire through the circle of the hickey.
- 7. Loosen the screws on the socket slightly, enough to get the wire behind the top of the screw. Bend the wire end into a "C" and wrap around the base of the screw. One on each side.
- 8.Tighten the screw so the wire is snug. Screw the hickey onto the bottom piece of the bushing as shown.

- 9. Slide the bottom bushing piece up through the center hole of the shade holder.
- 10. Screw the bushing pieces together with the shade holder in between them. The bushing is a strain relief so the wire doesn't have to take the weight of the jar.
- 11.Carefully slide the cardboard piece back onto the base of the socket, covering the wires. This insulates the socket.
- 12. Put in the candelabra bulb.
 |
| TA-DAAAAA!! |
Plug in, switch it on and admire the glow that it adds to your special space!
Adventurous Mason Jar Lamp~Screw top Mason Jar
If you have the regular screw-top Mason jar, you can still make a lamp. It will just take one extra step.
Basically, the lid can be the antique zinc lid or a regular one piece lid. You can spray paint the regular lid if you like.

The extra step.... you must drill a center hole in the lid. Using a power drill, make a hole in the center 7/16 inch in diameter. Note: My husband did the drilling for me and he said that he started with a smaller hole and worked his way up. The hole needs to be big enough to fit the bushing into it.
Also... you need 4 air holes around the center hole. These should be smaller, about 1/4 inch in diameter.
Don't worry if the zinc lid has a piece of white porcelain in it. (Some do and some don't.) That needs to go so you can make the lamp. My husband drilled a small hole in the center and then took a sharp nail and hammered it so the porcelain would break. Then he threw the porcelain away.
That's it! :) Continue with the above instructions for your Mason jar lamp.
Let us know how your lamp turned out. We would love to see pictures!
Now available in our Etsy Shop, Cabin Shabby Chic!!
Happy decorating,

You will find us linked up at some of these fine sites.
I am so in love with Mason Jars and this tutorial looks so easy! Thanks for all the pics! PINNED =) I found you on I Should Be Mopping The Floor Linky Party!
ReplyDeleteGlad you liked it! It is very easy, just get the right parts and you're all set!
DeleteSend us a pic if you do make one!
Gloria
Love this! I'd like to invite you to link up to Saturday Spotlight @ Angels Homestead. The party runs from Saturday 12 am to Wednesday 12 midnight.
ReplyDeletehttp://angelshomestead.com/saturday-spotlight-11/
Hope to see you there :)
April
Thanks for the invite! I'll head over there and link up!
DeleteGloria
Oh. My. Goodness! :D I love you ladies - officially. ;) I have an absolute obsession with mason jars (comes from my country kitchen obsession passed down by two aunts. Haha.) Thank you for this tutorial! I'll certainly put this one to good use! :D
ReplyDelete~Rachel~
Thanks, Rachel, you are so sweet and encouraging! Julia and I worked hard to get this together.
DeleteBlessings,
Gloria
LOL! Well, we love you officially back, Rachel! ;) I thought you might like this tutorial! Thanks for taking the time to comment, it's always lovely to get one from you. <3
Delete~Julia
I love this idea!!! Thanks for sharing!
ReplyDeleteYou're welcome - and thanks for commenting, it's fun to meet another "resourceful gal"! ;)
Deletewhat a great idea! xo
ReplyDeleteThanks! :)
DeleteSuch a smart idea. It turned out great! I'd love if you'd link up to The DIY'ers. http://homecomingmn.blogspot.com/2013/04/the-diyers-and-more-curtains.html
ReplyDeleteThanks, Kayla, I'll head over there right now. Thanks for the invite!
ReplyDeleteGloria
Awesome tutorial! This lamp is soooo cool! Would love it if you would link this up to Give Me The Goods Monday: 1 Party, 5 Blogs! http://www.rainonatinroof.com/2013/04/give-me-goods-monday-3-link-party.html
ReplyDeleteJenna @ Rain on a Tin Roof
Thanks for the invite! We linked-up! :)
DeleteGloria
Amazing light fixtures, they look so adorable!! Thanks for the great tutorial:)
ReplyDeleteKrista @thehappyhousie
Thanks for the kudos! :)
DeleteGloria
Love this! Pinned ;) Thanks for the tutorial! :)
ReplyDeleteThanks! and You're welcome!! :)
DeleteGloria
This is a great idea. I have a box of old Mason/Ball jars from a basement in NY someone gave me.
ReplyDeleteLove your pictures. I do better with pictures than written instructions (rather impatient).
Found you on What I Whipped Up on Wednesday. Thanks
Linda tumbleweedcontessa.com
Love to see some pics if you get them done!
DeleteGloria
What a great idea! There are so many vintage jars out there...this is perfect!
ReplyDeleteThanks for sharing,
Leanne
Thanks for commenting! :)
DeleteGloria
Very cool! I love this! :)
ReplyDeleteThank you for linking up at Marvelous Mondays this week!
Thanks and thanks for leaving such a nice comment!
DeleteGloria
Love the idea! Country and cute at the same time! -Abby
ReplyDeleteThanks!! :)
DeleteGloria
How did you know I love mason jars! haha! Pinning this!! Thank you for sharing with us at the Give Me The Goods Link Party!
ReplyDeletewww.dimplesandpigtales.blogspot.com
Thanks for pinning and commenting back. I really like the Give Me the Goods party! It was great!
DeleteGloria
This is so clever! Thank you so much for linking up to Make Bake Create!
ReplyDeleteThank you, and you're very welcome - thanks for hosting! We love linkies! :D
DeleteLove this idea! It's absolutely perfect with the summer months coming! We'll be featuring this at Someday Crafts tomorrow, so if you have a minute, we'd love if you'd come by and check it out.
ReplyDeleteWow, that's awesome! Thank you Miranda! We will definitely pop by and check it out tomorrow. :D
DeleteThis is a fantastic tutorial! All step-by-step :-) Great for dummies like me ! Thank you so much for sharing this awesome project at our ALL MY BLOGGY FRIENDS party :-)
ReplyDeleteWe're thrilled that you like the tutorial, Linda, and thanks for hosting the party!! :D
DeleteWould these work outdoors or would some of the supplies need to be changed? I would love to have these by my pool!
ReplyDeleteHi Jenna,
DeleteNO, unfortunately, these lamps will not work well outdoors. They are indoor light fixtures like a regular lamp. Too bad though, because that's a cute idea! :)
~Julia
Bummer! Thanks!
DeleteThis is fantastic! Can't wait to try this out! :) Thanks for sharing!!
ReplyDeleteAmanda* http://modernhippiemomma.blogspot.com/
Thanks Amanda! Let us know how you liked the tutorial! :D
DeleteLadies...this is so creative! I knew mason jars could be used for something more than drinking sweet tea. Tee hee! But seriously, I just love how you repurposed it. Thank you for sharing your idea at WJIM. Blessings.
ReplyDeleteThank you Naomi! We love repurposing things, especially mason jars! :D Blessings to you too!
DeleteGreat tutorial! You are featured this week on Busy Monday at A Pinch of Joy! I hope you will stop by and grab a Featured Button from the Button Box on the top of the sidebar. Pinned.
ReplyDeleteThank you so much for featuring us, we're honored!! :D We'll grab the button and add it to the "featured" section on our sidebar. Thanks for pinning our tutorial! :D
DeleteWhat a gorgeous lamp and I love that you used something from the kitchen. Thanks for sharing on Thursdays Treasures.
ReplyDeleteThanks Christie! Oh yes, it's so cute when kitchen light fixtures are made with kitchen objects... I love that style! :D
DeleteThanks for linking up to the Make Bake Create party last week! I just wanted to let you know, you have been featured! http://www.creativeprincessbrandi.com/2013/04/make-bake-create-blog-party-week-3.html
ReplyDelete*Squee!* We love being featured! ;) Thank you, Brandi! (Love your blog name, by the way - 'Creative Princess' is just too cute.) :)
DeleteWhat a great tutorial! And the lamps look great! Thanks for linking up for Friday Favorites. I'm featuring you this week!
ReplyDeleteYay!!! Thanks so much for featuring us, it's such an honor! :D We're glad you like the tutorial. :D
DeleteThis is awesome; I can't wait to make one these; excellent gift idea! Thank you so much for sharing this with us last weekend! You are a Featured Favorite on Saturday Show & Tell on Cheerios and Lattes this weekend! We love having you join us and can't wait to see what you've been up to this week! Have a great weekend!
ReplyDeleteMackenzie :)
Woohoo! Thank you so much for featuring us! (I love your blog... Cheerios and Lattes is such a fun name!!) We've already linked up our newest project, the Mason Jar Mantle Makeover. :)
DeleteNice tutorial I am pinning this for future use! Now a new follower on Bloglovin ;)
ReplyDeleteYay! Thanks for following us, Theresa! Ooh, we love it when our stuff gets pinned. ;)
DeleteGreat tutorial~I'm so pinning this to do later! I've been wanting to make a Mason Jar light for sometime but haven't gotten around to it yet. Seems as though a lot of the projects I want to do seem to get put on the back-burner to do other ones. You make it look so easy, thanks for sharing.
ReplyDeleteVisiting you from Met Monday~I hope that you will come by for a visit too.
Have a beautiful day!
Glad you liked the tutorial, Jana! We will surely come by and visit your link-up, thanks for inviting us!
DeleteGreat idea..............Thank you for sharing with the Clever Chicks Blog Hop this week; I hope you’ll join us again!
ReplyDeleteCheers,
Kathy Shea Mormino
The Chicken Chick
http://www.The-Chicken-Chick.com
You're welcome Kathy - we thought you might like the 'country' vibe of this project! :D
DeleteI like the look of the antique blue glass mason jar lamp you've got there, sweet!
ReplyDelete